HOST LIVE hosts Audio Unit and VST3 effects for live use. It has 48 channel strips. Each strip takes
one input from your audio interface (mono, or a stereo pair), runs it through a chain of up to
four plugins, and sends it to one output. It is built to be set up once, started, and left alone
on stage.
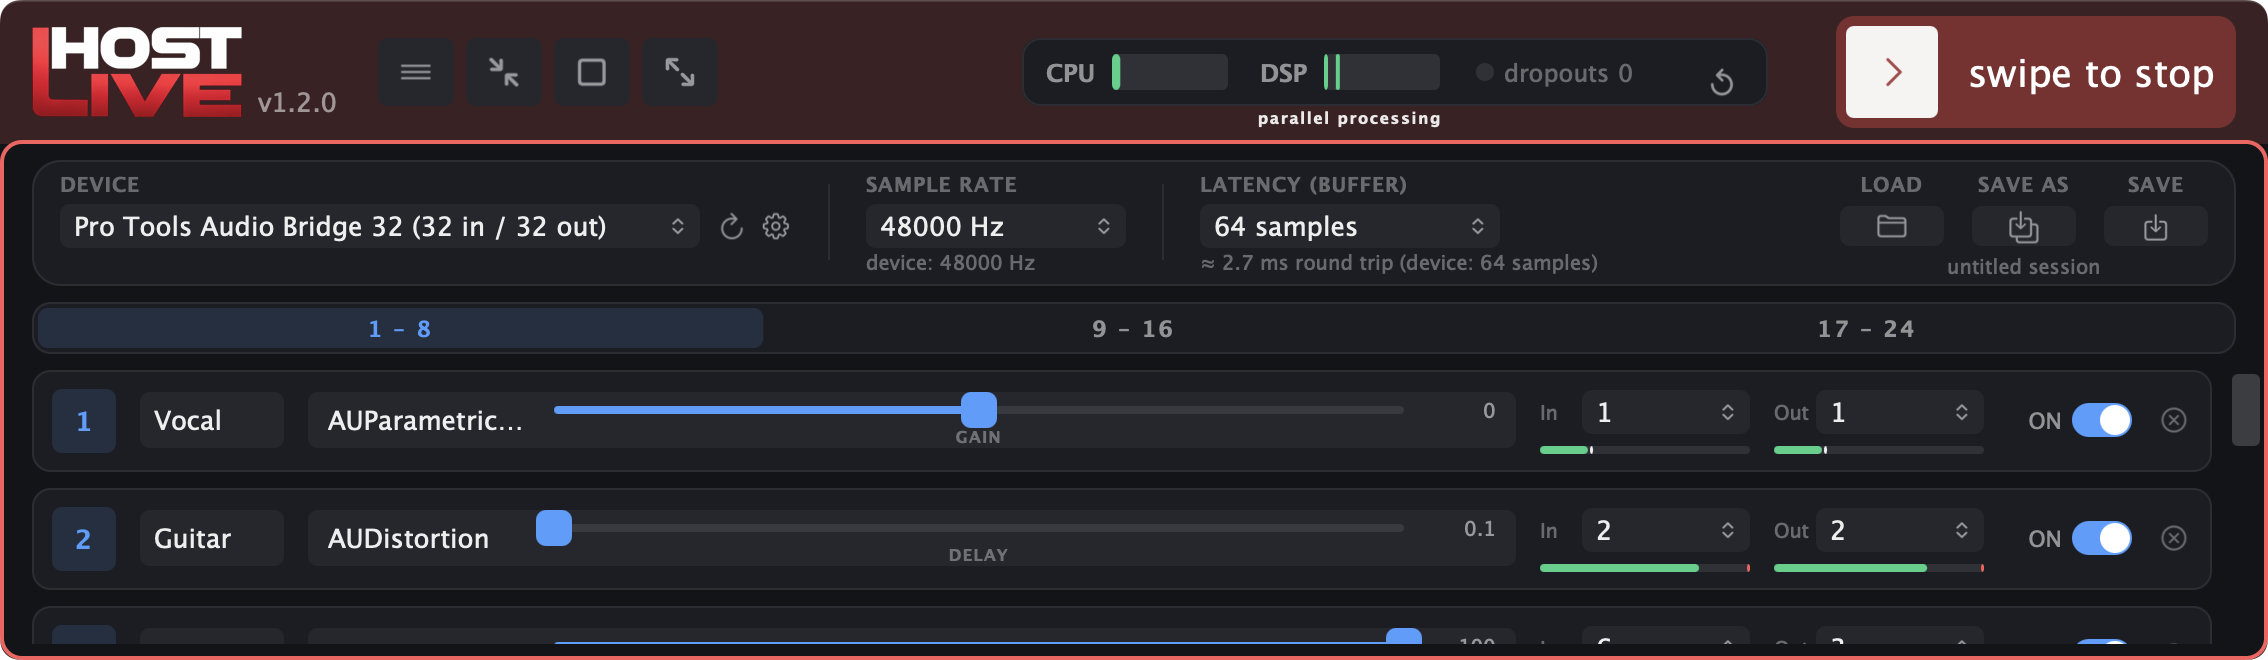
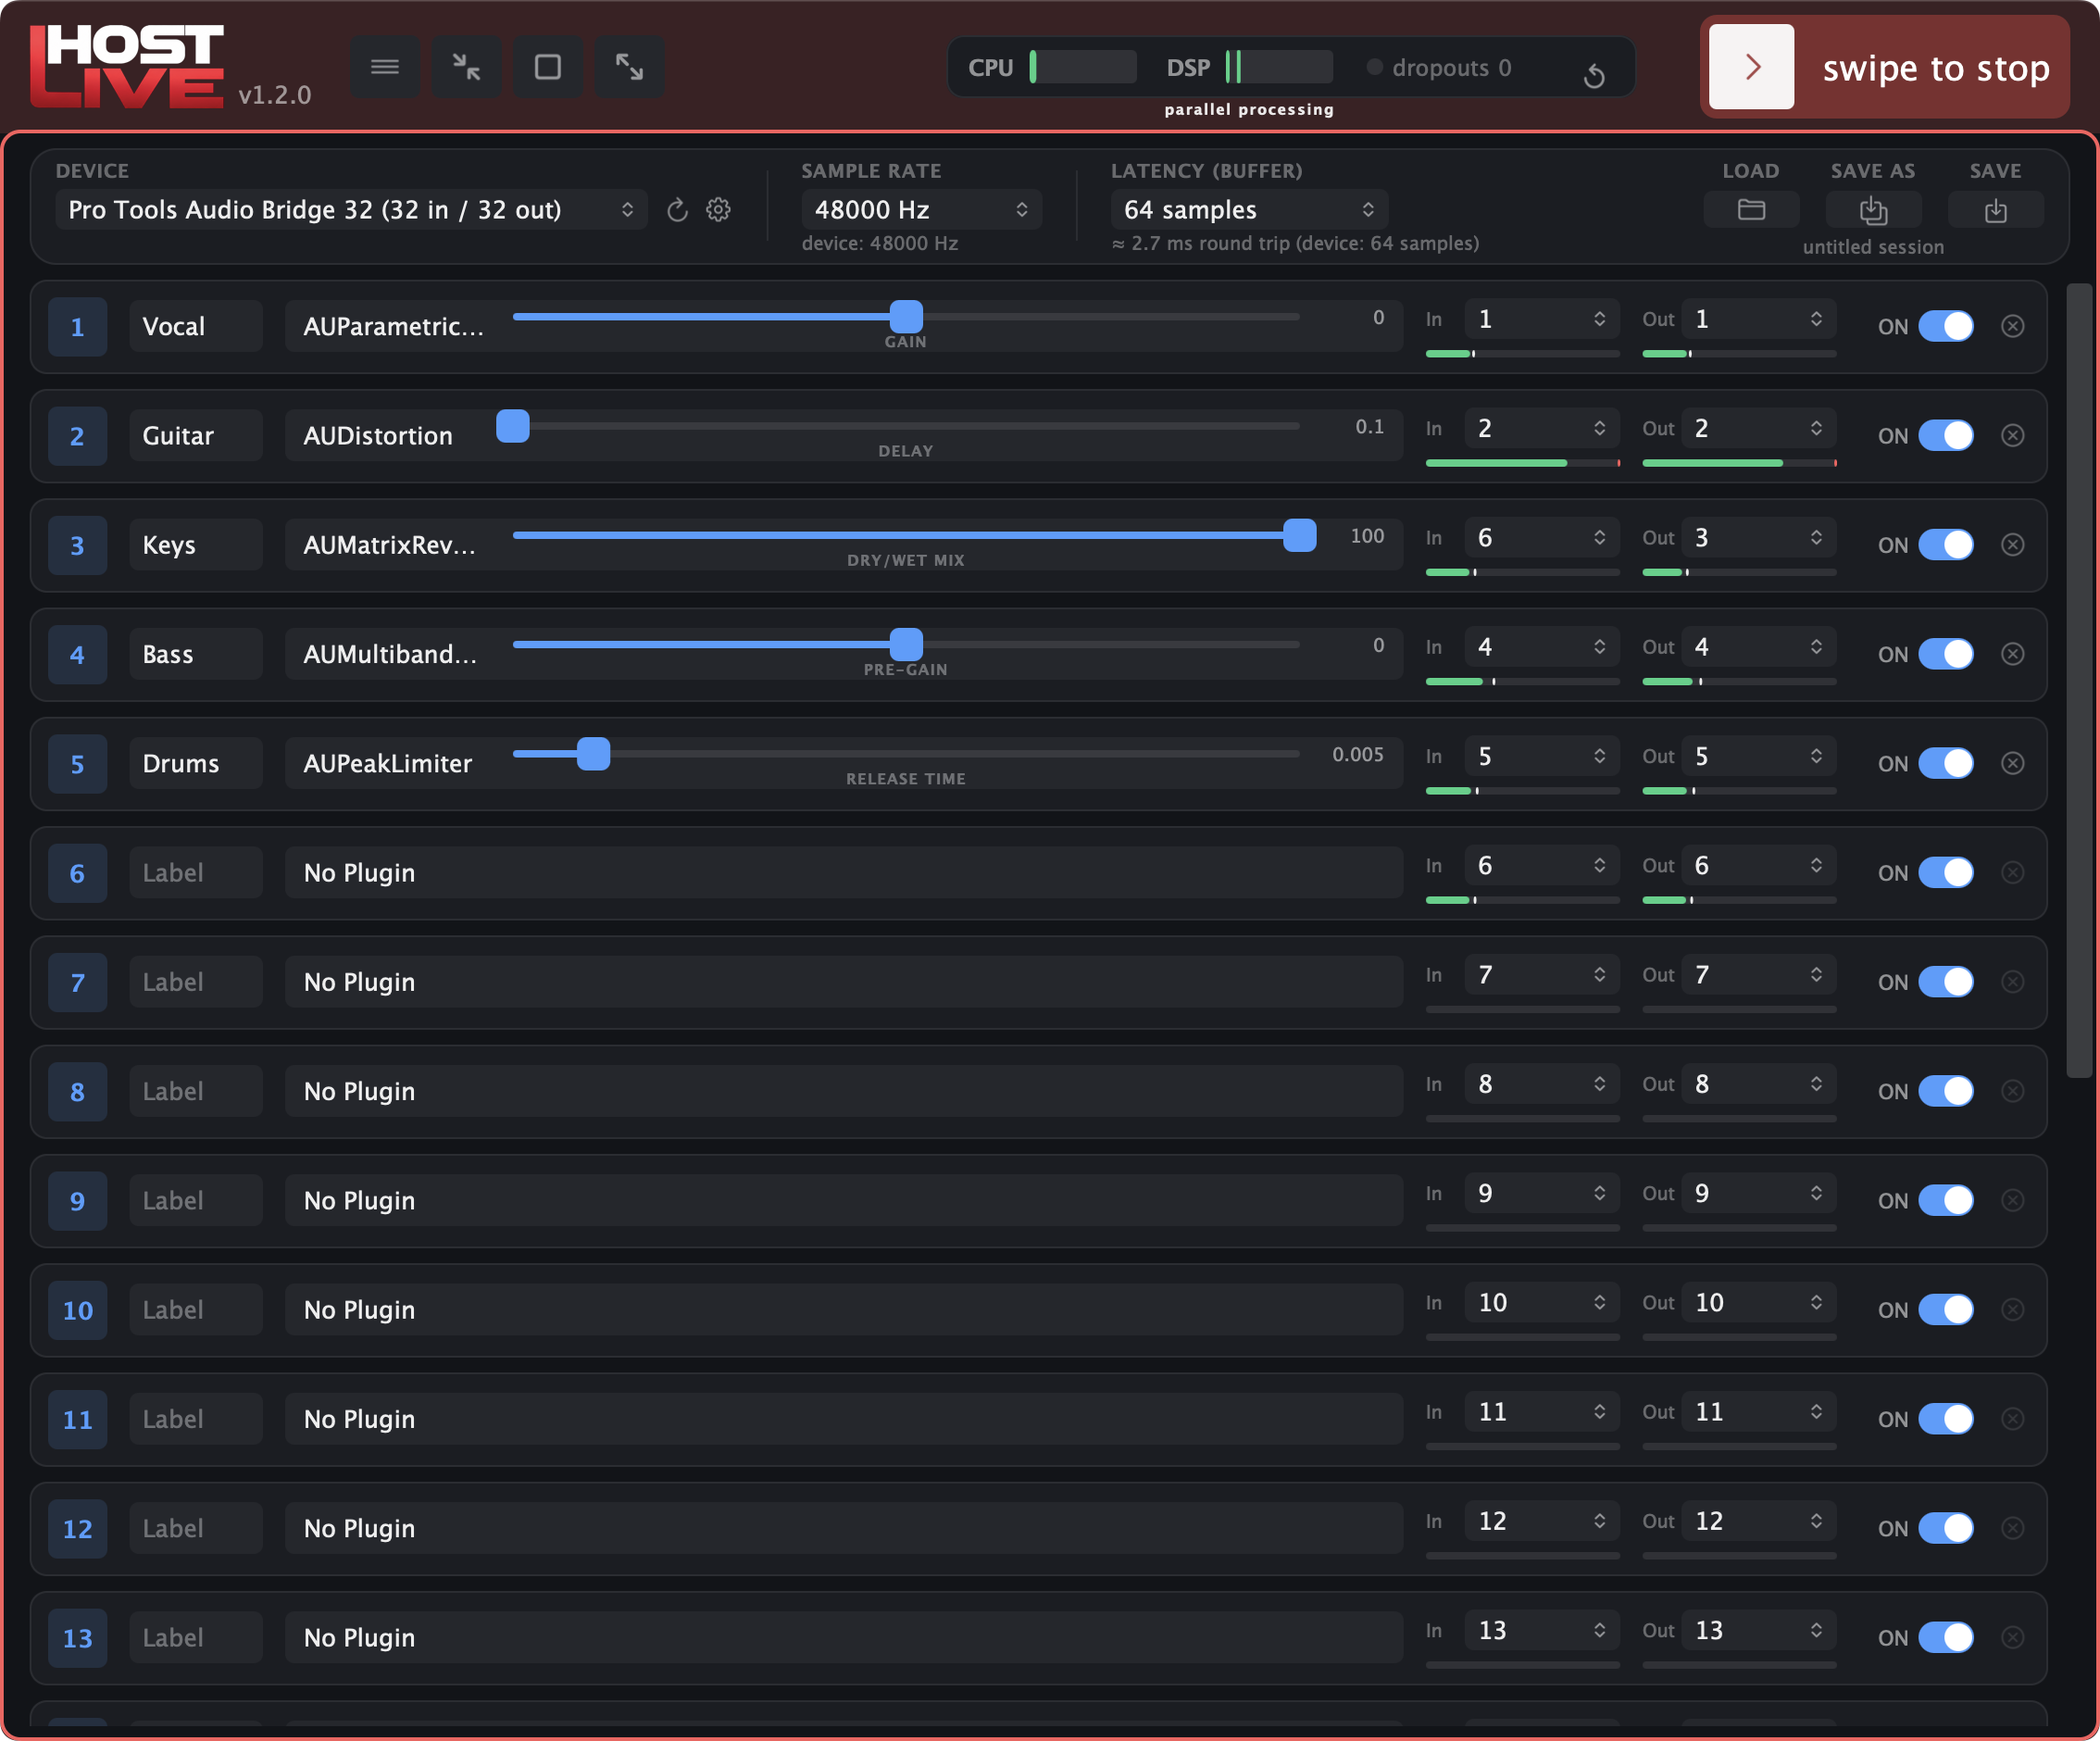
The main window while the engine is running (the red frame and the “swipe to stop” button show that it is live).
1. Getting started
Choose your audio device in the Device menu. The circular arrow refreshes the list; the gear opens the device's own driver settings (the manufacturer's control app, or Audio MIDI Setup when there is none).
Set the sample rate and the latency (buffer). A smaller buffer means lower latency but more work for the processor. 64 or 128 samples is a good start.
Give a channel a plugin. Click the plugin box on a strip and pick a plugin from the list. Name the channel in the label field if you like.
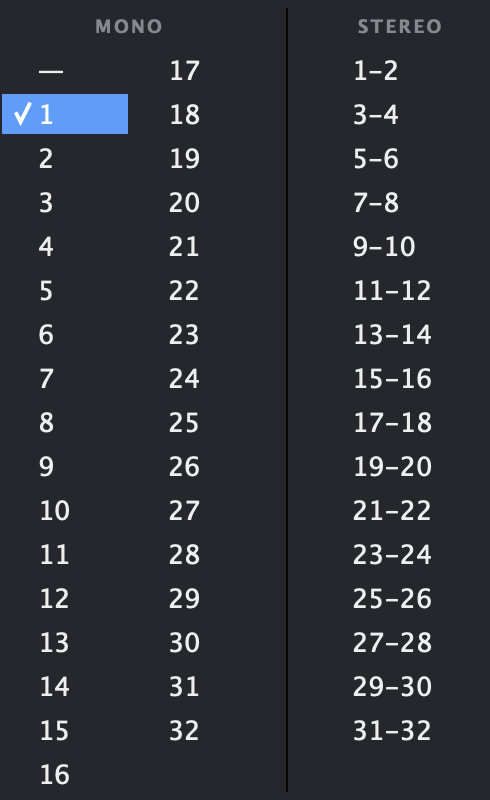
Choose the channels. In and Out pick the interface channel the strip uses. The list shows single channels (mono) in columns of 16, followed by stereo pairs (1-2, 3-4…); choose a pair to make the strip stereo. A device with more than 64 channels offers them in banks of 64 instead (1 – 64, 65 – 128…), a submenu each, and Type a number…: write 130, or 130-131 for a pair, and press Return.
Press Start. The button turns into swipe to stop.
Stopping is a swipe. To stop the audio, drag the button to the right. A stray click in front of an audience can't silence the band. ⌘R starts and stops from the keyboard.
2. The window
Header
Header: window buttons, Rehearsal (R), the tempo, the load meters, and Start / Stop.
Start / Stop
Starts the engine. Stopping needs a swipe.
CPU
How busy the whole computer is, across all its cores – not just HOST LIVE.
DSP
The part of each block's time the processing takes. 100% is where the next block is late, so keep it well below that. The thin mark is the worst block since Start: amber when it was high, never red, since a long block is not yet a broken sound. P/P beside the DSP bar lights up while the channels are processed in parallel, on several threads.
dropouts
Blocks the audio device really missed, as Core Audio reports them to HOST LIVE - counted only while a signal was passing, after the first seconds of a run, and when HOST LIVE itself saw the processing go late at the same time (some devices report misses all the time), so a gap in silence does not add to it. The counter stays red until you reset it with the arrow beside it.
Window buttons
Minimise, back to the default size, and full screen - and R, rehearsal mode (below). Right of the R, Undo (a curved arrow) appears after a change to the plugins and takes it back: a plugin put in, replaced, taken out, moved or pasted, or a channel cleared - one step at a time, the last first. It is there only while there is something to take back, and not while the engine is held still.
BPM
The tempo the plugins are told. A small blue dot to the left of the word BPM blinks on every beat, counted from the last tap (or the last tempo the console gave). Tap it three times or more to set it: the average of up to the last ten taps, as a whole number of beats a minute - it goes on getting steadier while the taps go on; a tap that is off by more than a fifth of the usual interval is left out, and a pause of over two seconds starts again. Right-click it to Enter tempo… (type a number from 30 to 300), to choose where the tempo comes from - ProLink (the console's, the start), Taps only, or a MIDI clock (All inputs or one input) - or to Learn a MIDI note or controller that taps it - the same messages cannot also be a snapshot's or a plugin parameter's. Bright while a clock comes in; taps are ignored then. The panel can be put away - View ▸ Hide Tempo, or Hide Tempo in its right-click menu - and the header buttons take its room; a right-click on the header brings it back (Show Tempo).
Rehearsal mode
The R button beside the window buttons switches rehearsal mode on and off, and works only while the engine is running: with the engine stopped it says so instead, and stopping the engine switches rehearsal mode off. The header and the frame of the window go yellow. In rehearsal the engine keeps running while you add, replace, move and remove plugins, drag them between strips, and change the routing (In, Out, ↓ below); a plugin that is already running stays as it is, with its settings and open window, and only what is new is loaded. A plugin's box still opens its window as it does when running; an empty box, and Choose another plugin… in the box's right-click menu, open the list. Each change is put in a moment after the last one: the sound dips for a fraction of a second, and loading a plugin takes processor time, which can cause dropouts. Rehearsal is for rehearsals, not for a show. Turning it on says so; Don't show this again silences that. Rehearsal is off at every start. The device, sample rate and buffer still need a Stop and Start, as does a channel the device was not opened with. A plugin that does not load leaves the engine running and says so.
Device bar
Device, sample rate, latency, and Load / Save As / Save for sessions.
Under the buffer HOST LIVE shows the estimated round-trip latency of the whole signal path. Load (⌘O) opens a session and Save As (⇧⌘S) stores one under a name you choose. Save (⌘S) overwrites the session file you last opened or saved with the current setup, without asking; if there is none yet, it works like Save As. A session holds every channel's plugins, their settings, the routing and the labels. The session's name is shown under the Load and Save buttons, and the last session you opened or saved comes back the next time you start the app. When you quit with changes that are not in the session's file (a changed arrangement or a plugin setting), HOST LIVE asks whether to Save, Don't Save or Cancel. A setup that has no file yet is kept by the automatic save instead, so it is not asked about.
Channel strip
One channel strip.
Number and label
The channel's number, and a name of your own (“Vocal”, “Bass”…). The name also appears in the plugin's window title. Right-click the number to copy the channel's plugins, with their settings and Quick Controls, and to paste them into another channel (not the routing, bypass or label; a paste takes effect at the next Start). Exclude from snapshots in the same menu puts a thin red line down both sides of the strip, bending into its rounded corners and fading out there: that channel is then left out of snapshots, which neither store its plugins nor change them. Colour in the same menu gives the number's box one of six muted colours (sand, steel blue, teal, moss, amber, mauve), chosen from a row of squares, or none; two strips in a row share the upper one's. It is only there to tell strips apart.
Plugin box
Stopped: click to choose a plugin, or drag a plugin to change the order in a chain. Running: click to open the plugin's own window; Alt on a plugin window's close button puts away every plugin window at once.
+
Adds another plugin after the last one, in series. A chain holds up to four.
In / Out
The interface channel the strip listens to and plays to, a single channel or a stereo pair, chosen from the same list. The thin bars below show the level (green; the white mark is the recent peak). Alt-click or right-click to reset this channel's routing (none, mono) or, after a confirmation, every channel's. Custom pair… in the list makes a stereo pair of two channels that are not neighbours (1-5, 12-31…): write them with a dash, and the left one first. Link In/Out, the first entry under the dash in the In list (one switch for every strip, it says on or off), makes an input you choose be chosen as the output too, and the other way round - the same channel or pair, where the device has it. Dragging up or down on the IN or OUT square (plus or minus 12 dB, double-click for 0) sets the strip's gain trim: IN before the first plugin, OUT after the last; the pointer moves three times as far as the trim does. A small blue mark on the level bar shows where a trim other than 0 lies; the meters show the signal after the trim.
ON / OFF
OFF bypasses the plugins: the signal still passes, but goes round them. Hold Alt while you click to do it to every channel at once: all go to the state this one is switching to.
⊗
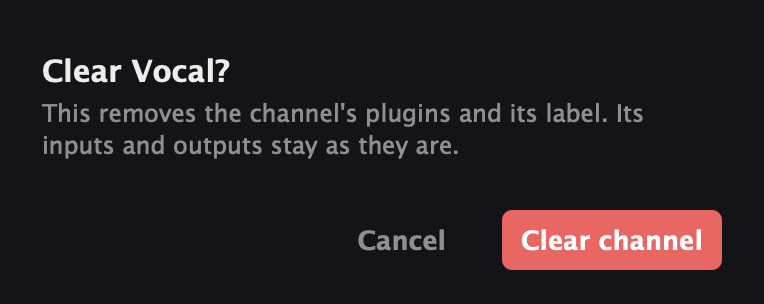
Clears the channel (its plugins and its label). It asks first. Hold Alt while you click to clear every channel; that asks first too, and says how many channels it will empty.
Clearing a channel asks first.
Clearing a channel removes its plugins and its label, and nothing else: its inputs and outputs stay as they are. The sheet asks first so that a stray click on the ⊗ button can't empty a channel on stage. Escape, or a click outside the sheet, cancels.
The In and Out lists: single channels (mono) in columns of 16, then stereo pairs.
3. Plugins
Click the plugin box on a stopped strip to open the plugin list. Plugins are grouped by manufacturer; type in the search field to find one by name or manufacturer. The top row, No Plugin, passes the signal straight through.
AU / VST3. The switch at the top chooses the format. Audio Units are listed at once.
VST3 scan. VST3 plugins can only be listed by loading each one, which takes a while. The first launch offers to scan; the Rescan button starts a new scan later. The list is kept, so the wait happens once. A blinking notice under the device menu says while it runs.
Between channels. While stopped, hold a plugin for a moment and drag it onto a plugin of another channel: it goes in front of that one (or into an empty channel). Hold Alt as you drop it to copy it, with its settings. Dropped on the middle of a plugin (the box turns amber), it replaces that plugin, after asking.
Copy-protected plugins (iLok and similar) work if their licenses are authorised on this computer. If one can't load, HOST LIVE says which channel it was.
The plugin list: format switch, search field, and the No Plugin row.
Two strips in a row
The Out list of a strip has ↓ below next to the dash (not on the last strip). Chosen there, the strip below takes what this one puts out instead of an interface input, so two strips can work in a row (up to eight plugins together). The link is made from the upper strip only: the lower strip then has no In picker, the two number squares become one tall rectangle with a bent arrow in its lower half, and a thin blue line goes round both. The upper strip's audio goes to the strip below alone, no longer to the interface; choose an output on the upper strip to separate the two again. The signal between them is as wide as the upper strip's input. The two run one after the other in the same block, so there is no extra delay, but they cannot share the processor's cores as separate strips do, and the pair counts as one in the DSP meter. A strip can be linked to the one below only if neither is already part of a pair, so at most two strips are linked. The choice takes effect at the next Start, like the rest of the routing.
Sidechain
A plugin that has a sidechain input (a compressor, a de-esser) offers it in the menu of its box: right-click ▸ Sidechain input, then a mono input or a stereo pair of the device, or None. The box then shows a small blue arrow in its top left corner (rest the pointer on the box to see which input). Instead of an input you can choose From a plugin: the output of another plugin, in this strip or another (sidechaining a compressor to a vocal, say). A plugin that comes earlier in the same strip is heard at once; any other is heard one buffer late, which the menu says in milliseconds (1.3 ms at 64 samples and 48 kHz), because the strips are processed side by side and none waits for another. A bypassed plugin passes its input on to the sidechain unchanged, and a source that is taken out of its strip is no longer a source. The plugin's sidechain is switched on when the engine starts, so a first choice, or a change between mono and stereo, takes effect at the next Start; once it is on, choosing another input takes effect at once. The menu offers the sidechain as soon as you have chosen the plugin: it is loaded once in the background, which is when it says whether it has one (see Looking at a plugin). The same choice is in the top bar of the plugin's own window (in Touchscreen Friendly mode, in its header beside the window's buttons).
MIDI control
Every plugin can have its parameters moved from MIDI. In the plugin's own window the bar at the top has a MIDI button: MIDI control switches it on, Input chooses which MIDI input it listens to (all of them, or one), and the list below holds what is mapped. With MIDI on, a Learn button appears beside it. Press Learn, take hold of a parameter in the plugin's window (the button says Touch a parameter…), then move a knob or fader, play a key or bend the pitch wheel on your controller (Now move the control…): that message now moves that parameter, and Learn ends. A parameter has one message; learning it again replaces it. Controllers, pitch bend and notes can be learned.
Each mapping has a way of working, chosen in its submenu. For a controller or pitch bend: Jump (the parameter goes where the control is, at once), Pickup (the parameter moves only after the control has reached it, so that a snapshot recall or a change made by hand is not followed by a jump) and Endless encoder (an encoder that sends steps rather than positions moves the parameter up and down from where it is). For a note: Toggle (each press switches the parameter between off and on) and While held (on while the key is down). Remove takes a mapping away, Remove all all of them. The mappings are kept with the plugin in the session, and work while the engine runs.
A message that already recalls or steps a snapshot cannot be learned for a parameter, and the other way round: a notice says so. When you copy a plugin that has MIDI control (Alt-drag, Replace, or Paste plugins) you are asked whether the copy gets the same MIDI control, since it would then move together with the original.
The way back. The MIDI menu also has Send parameter changes back to the controller (available while MIDI control is on): what each mapped parameter is now goes out to the controller, so that its motor faders and LED rings follow the plugin however the parameter was moved - in the plugin's window, by a snapshot, by automation or by the controller itself. Output chooses where it goes: Same as the input (the output of the same name, as a controller shows up as both) or one of the MIDI outputs. The message a controller has just sent is not sent back to it. A controller with a display also gets, for every mapped parameter, its value as the plugin writes it (“-6.0 dB”) and its name, as a SysEx message of HOST LIVE's own (F0 7D 48 4C 01 …) that other devices pass over; HOST LIVE Link shows them on the iCON D4. Off by default; the choice is kept with the plugin in the session.
The other format. Where the same plugin is installed as an Audio Unit and as a VST3, the right-click menu of its box offers Switch to the VST3 version or Switch to the Audio Unit version: the other one takes its place in the chain, with the channel's other settings kept. Only while the engine is stopped (or in rehearsal mode).
Looking at a plugin
When you choose a plugin, HOST LIVE loads it once in the background, while the engine is stopped: its box says loading… for a moment. What it finds out - whether the plugin has a sidechain, its latency and how many channels it takes in and puts out - is in the box's tooltip and is kept in the session. A plugin that will not load (an iLok that is not plugged in, a license that has lapsed) says so right away, with the same Try Again and Remove Plugin as at Start. If the app goes down while a plugin is being loaded, that plugin is taken out of the session the next time, so it cannot do it again. The latency is read again at every Start.
The plugin's top bar
The bar at the top of a plugin's window holds, from the left, a Bypass button (the plugin is passed by untouched; it is the same switch as the channel's, and is lit amber while the plugin is bypassed), the Sidechain and Tempo choices where the plugin has them, and the MIDI and Learn buttons described above. View ▸ Hide Plugin Control Strip takes the whole bar away from every plugin window and Show Plugin Control Strip puts it back; the sidechain can still be chosen from the channel's menu. A right-click on an empty part of the bar offers the same, with a notice of how to bring it back. In Touchscreen Friendly mode the header stays when the bar is hidden, and a right-click on it brings the bar back.
Quick Control
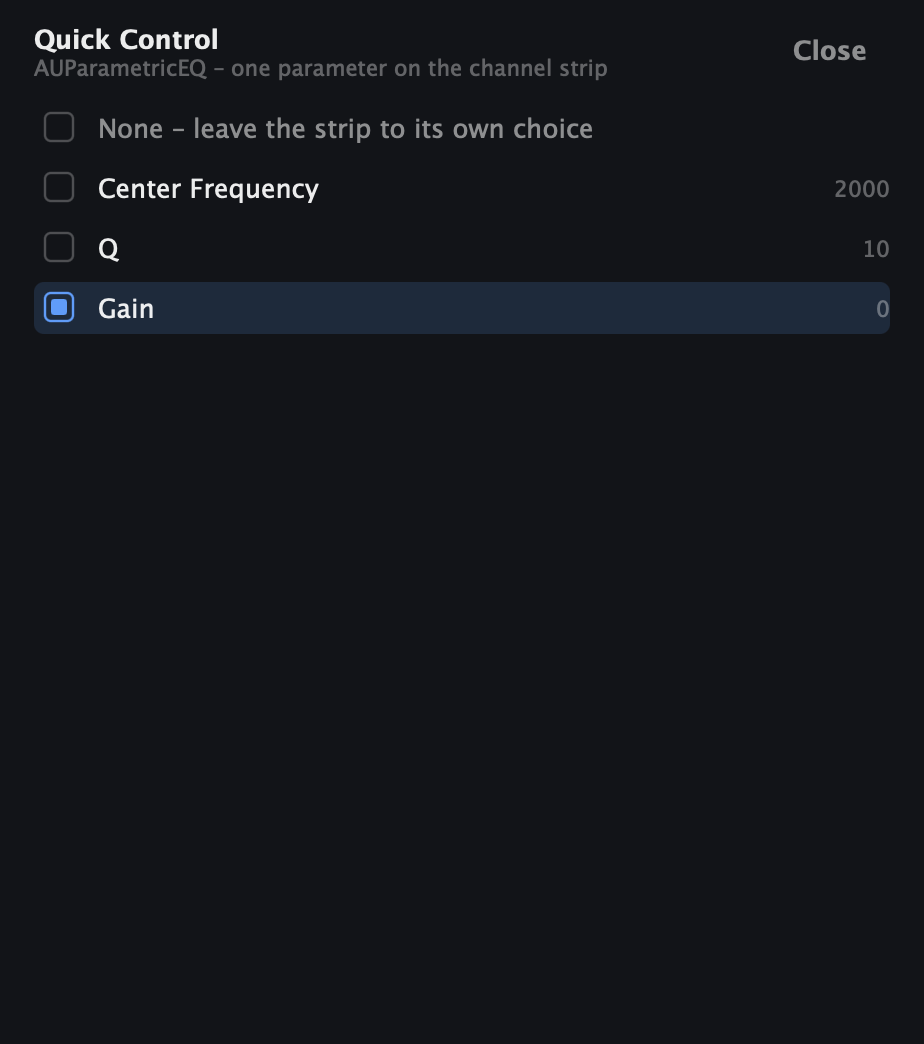
While the engine runs, right-click anywhere on a plugin's box, the slider included, and choose one of its parameters. A slider for it appears on the strip, so you can change it without opening the plugin's window. A channel has room for two Quick Controls, on one plugin or on two. When the channel has several plugins, those that have one get the wider boxes and the others shrink to their names; with two on one plugin, they share its box. Tick a parameter to put it on the strip, tick it again to take it off. With two on the strip already, choosing a third asks which of them it takes the place of.
The list starts with two choices: Default leaves the strip to its own choice, which may put a control of its own for the plugin on the strip (a strength, say); None puts nothing of that plugin on the strip.
Quick Control: each strip shows the parameter chosen for its plugin – its name, a slider and the current value.
Right-click a plugin box and choose Quick Control…: the plugin's parameters, one to be put on the strip.
4. Window and view
The window can be any size. Make it wider and the strips stretch. Make it shorter and the lowest rows scroll, with a scroll bar on the right. Make it taller than all the channels need and the whole interface grows with it, widening the window to match.
A short window: rows scroll.
One page of channels.
Zoom with ⌘+ and ⌘− makes everything drawn larger or smaller; ⌘0 returns to 100%. The window size, zoom and page layout are kept in the session, so a saved session opens the way you left it. Hover Text Help (View menu) shows a short hint when the pointer rests on a control; turned off, the plugin boxes and the channel numbers still give theirs.
Touchscreen Friendly (View menu) makes the text in menus and pickers larger and their rows taller, so that they are easy to hit with a finger. A plugin's window then loses the system's title bar and gets the large buttons of the main window instead: Minimize and Close in a header you can also drag the window by. Off by default; the choice is kept.
View ▸ Six Pages of 8 / Four Pages of 12 / Two Pages of 24 / One Page of 48 Channels. Four pages of 12 is the default and shows the page tabs (1–12, 13–24, 25–36, 37–48); six pages shows 1–8, 9–16 and so on, two pages 1–24 and 25–48. One page lists all 48 channels, without tabs. The choice is kept in the session; a start with no session is four pages of 12.
View ▸ Hide Unused Strips (the item then reads Show Unused Strips) leaves the channels that have no plugin and no routing out of the pages: the others close up, the page tabs count only the channels shown, and the window shrinks to fit. A channel with a plugin or a routing is never hidden; show the others again to set one up. The choice is kept.
View ▸ Hide Plugin Control Strip takes the top bar - Bypass, Sidechain, Tempo and MIDI - away from the plugins' windows; Show Plugin Control Strip brings it back (see The plugin's top bar). The choice is kept.
Snapshots (View menu): a row under the device bar and a list window store how every plugin's parameters are set and whether it is bypassed (not the plugins or routing). Click the previous or next one to recall it, right-click to Store, or press Overwrite; MIDI can step through them (Learn in the list window), and each snapshot can have a message of its own that recalls it (the MIDI row under its name). They work while the engine runs. In the list window a place, a snapshot or an empty one, is moved by dragging it to where it should go, between two others; the places between shift by one to close the gap. A button in the header, beside the window buttons, shows and hides the list window. A snapshot also keeps the tempo: recalling it brings the song back at its own, unless the tempo is being followed from the console (ProLink) or a MIDI clock, which would only set it again. A snapshot made before the tempo was kept leaves it as it is. Off by default.
The snapshot row: the current snapshot in the middle, its neighbours beside it, Overwrite at the left end and Hide / Show List at the right end.
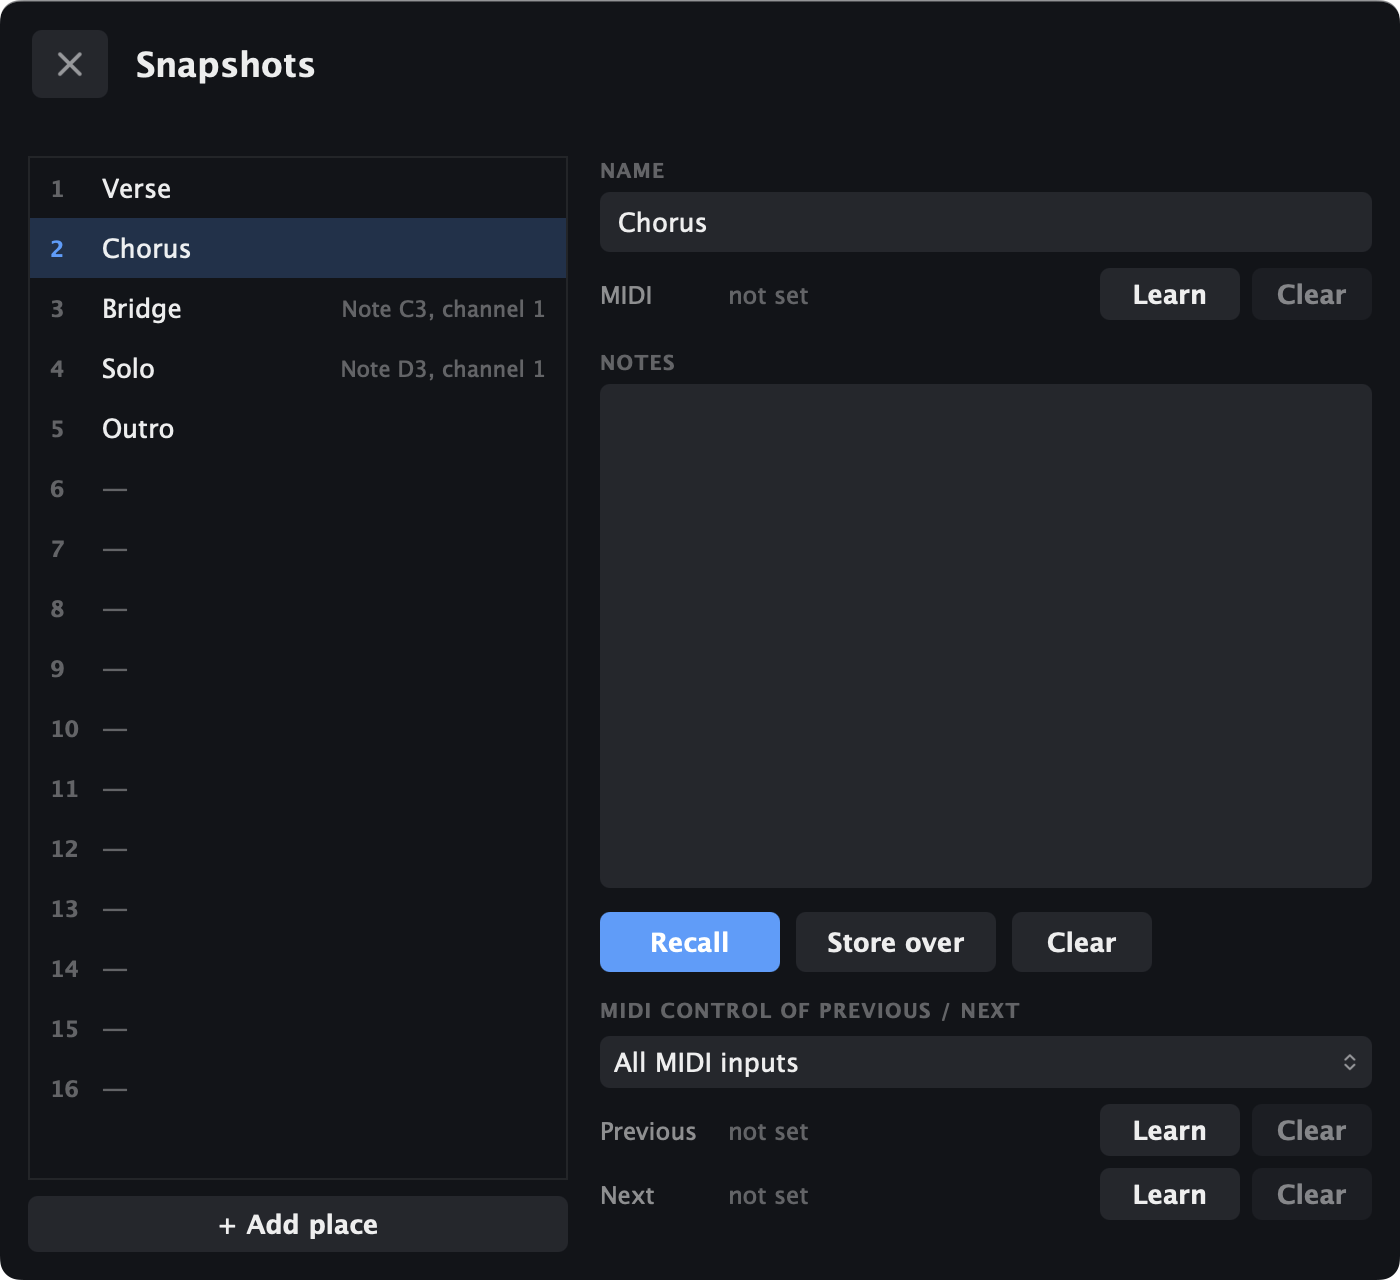
The list window, with MIDI control of previous / next.
5. Settings menu
Start / Stop
⌘R
Start Engine on Launch
When ticked, the next time the app opens it loads the last session and starts the engine by itself. Off by default. If the session's audio device isn't connected, the engine is not started: a yellow notice says it is waiting for the device, and you start it yourself once it is back.
CPU Cores
How many processor cores the channels are spread over (the audio thread is one of them). Automatic (the default) uses as many as the machine has, up to 10; 1 core runs everything on the audio thread; any larger number spreads the channels over that many cores. Changing it restarts a running engine. The Performance Test recommends a number, which is marked (recommended) in this menu until you quit.
Performance Test…
Runs your channels on the selected device, silently and on noise instead of your inputs, with different numbers of processor cores (about a minute), and recommends the number that gives the safest slowest blocks for this device, buffer size and set of plugins; Use N Cores sets the CPU Cores menu to it. Needs the engine stopped and at least one plugin. The window is closed with its Close button or Escape, not by a click outside it.
Auto Routing
When on, choosing a device hands the channels out in order (strip 1 to input 1 and output 1, and so on). Off by default: your routing stays as you set it, whatever the device has. On, a device with the channels your routing uses (about as many as the last one) keeps it as it is; only the strips whose channels the new device lacks are handed new ones. A channel the device does not have (a smaller device, or one whose channels change) shows as (n/a) and is left out; it is kept in the session and works again when the device has it.
Transport Plays
Off by default: the plugins are told that nothing plays. Ticked, they are told from the moment the engine starts that the transport is playing, with a time that counts from then and the beats at the app's tempo - what a plugin that measures over time or follows the host's position needs, an integrated loudness meter for one.
Restart Transport
Sets the time the plugins are told back to zero, so that a measurement that counts from the start begins again.
Delay Compensation
See below. Off by default.
Autosave Every 10 Minutes
On by default. Besides saving a moment after every change to the setup, the app writes its autosave every ten minutes, so that what you changed inside a plugin's own window is not lost if the app closes unexpectedly.
Tempo from
Chooses where the tempo the plugins are told comes from: ProLink (the console's - the start), Taps only, or a MIDI clock (a drum machine, a DAW): All inputs (the first to send a clock is followed) or one input. The tempo in the header is bright while ProLink or the clock gives it. Every plugin's window has its own Tempo button: App tempo, ProLink or the clock of one MIDI input - so one plugin can follow another source than the rest - and its ratio to that tempo (the same, triplets, double, half). The same choice is in the right-click menu of the BPM panel.
ProLink compatibility…
Opens a window where a DiGiCo console is let follow and drive HOST LIVE as it does a Waves SuperRack: the switch (Follow the console), the state of the connection, the network adapter the console is on, and SuperRack through HOST LIVE.
Language
Choose English, Español or 中文. The change takes effect the next time the app starts.
Enter License…
Opens the license window.
ProLink compatibility
HOST LIVE can speak ProLink, the protocol a DiGiCo console uses with a Waves rack, so that the console treats it as one. Open ProLink compatibility… in the Settings menu, tick Follow the console and choose the network adapter the console is on (the one the console's or SoundGrid's network is plugged into). HOST LIVE then finds the console and connects to it; the window says what state it is in.
Snapshots. The console recalls HOST LIVE's snapshots by their place in the list, as it would a rack's, and is the master of the list: what it stores, inserts, renames and deletes is done here too, and on connecting it makes the list its own. A recall needs snapshots on and the engine running.
Tempo. The tempo tapped on the console goes to every plugin, from 30 to 300 BPM, and shows in the header's BPM panel, bright while the console is connected.
Sessions. The console's Load session opens the session of its name from Documents/HOSTLIVE (or asks for a file); its Save session saves there under its name. A console with no session open asks for a new one before it will save; HOST LIVE answers that it is done and clears nothing, so what the console then saves is saved as it stands.
Touch and Turn. The parameter last taken hold of in a plugin's window is the one the console's knob turns - faster in bigger steps, finer while the knob is held.
SuperRack through HOST LIVE. The console takes one rack at a time. With this ticked, SuperRack connects to HOST LIVE as it would to the console and HOST LIVE passes everything on both ways, so both can be used together. The knob goes to whichever asked last, and back to SuperRack when the HOST LIVE plugin window is closed.
HOST LIVE follows the console it finds first and remembers it; another console that answers is asked about before it is followed. Only a rack on the console's own network link may connect through HOST LIVE, and a rack's list of snapshots renames and adds snapshots here but never deletes them.
Tried with a Quantum and SuperRack 15.15. While ProLink compatibility is on, the wordmark carries the word ProLink.
Delay compensation
A plugin with look-ahead (a limiter, a linear-phase equaliser) reports that it delays the signal. HOST LIVE normally leaves each channel with its own delay. Turn Delay Compensation on and every channel is held back to line up with the one whose plugins add the most latency, so channels that are mixed together stay in time.
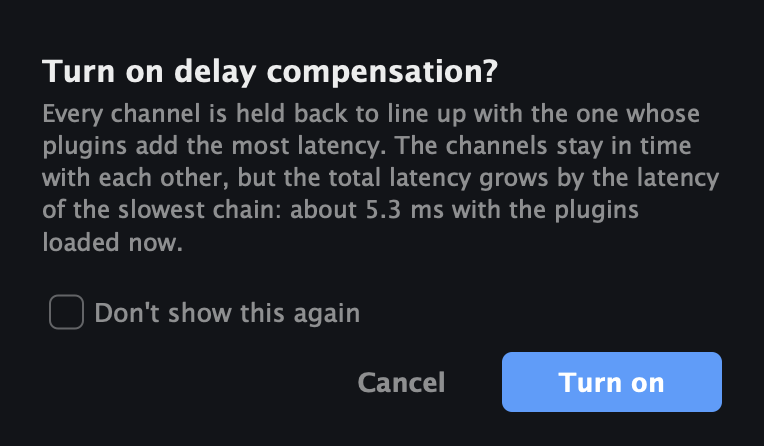
Turning it on asks first, because the total latency grows. Tick Don't show this again and it switches on without asking from then on.
While it is on, a yellow notice is shown beside the buffer.
While it is on, the square with each channel's number gets a coloured edge. Yellow means the channel is held back to line up with the rest. Red marks the channel with the most latency, the one the others are lined up with. Click the number to leave a channel out: it is no longer delayed, it no longer sets the pace for the others, and its edge goes. Click it again to put the channel back. The choice is saved with the session. Rest the pointer on the number to see that channel's latency and how much longer it is held back; with Hover Text Help turned off, that is all the hover shows.
It makes everything as late as the slowest channel. A bypassed channel counts as having no latency. Turning it off takes effect at once.
6. License and updates
Without a license HOST LIVE is a trial: playback runs for 30 minutes at a time, and you press Start to carry on. To license it, choose Settings ▸ Enter License…, type the email address and the key you were sent when you bought it, and press Activate. A license can be active on three computers at once, and activating needs the internet once; after that the license works without it. To use it on a fourth, choose Deactivate on one of the others first.
The same window has Deactivate while a license is active. It removes the license from this computer and the app returns to trial mode; you can enter the same email and key again at any time. Buy a license opens hostlive.pro.
HOST LIVE ▸ Check for Updates… asks hostlive.pro whether a newer version can be downloaded and offers the download page if so. At every start it asks Check for a new version?; answer Yes or No, and tick Don't show this again to stop the question.
If you have ticked Don't show this again, the app still looks for a newer version quietly at every start, and says so in the About window (a click on the logo) when there is one to download from hostlive.pro.
A click on the logo opens the About window, which also says whom the license was issued to.
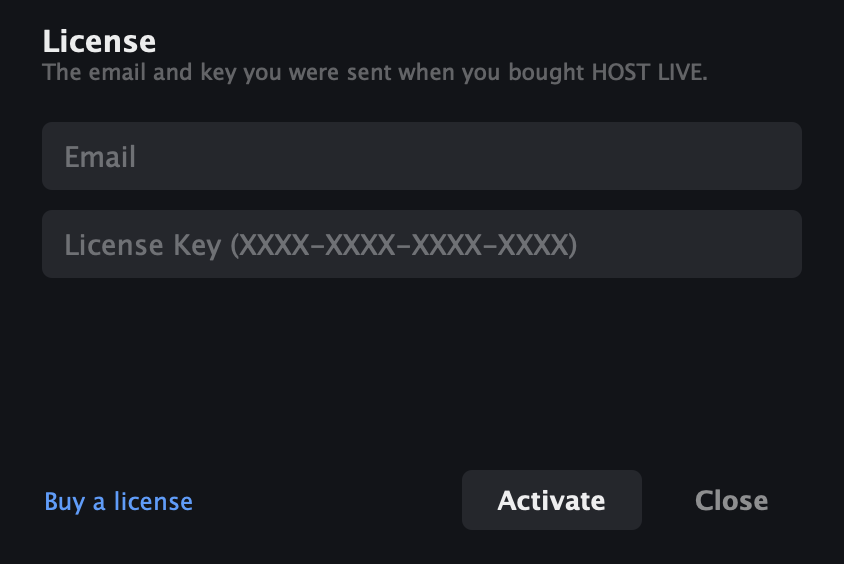
The license window.
7. Tips for live use
Load your session and press Start before the doors open. Scan VST3 plugins beforehand, not on the day.
Keep DSP comfortably below 100% and watch the dropout counter. If it counts, raise the buffer.
If the interface is unplugged, HOST LIVE stops and says so. Plug it back in; the same device is selected again and your routing is kept.
If your interface loops its outputs back to its inputs (a loopback or virtual device), keep an output away from the input of a channel you use: a loop howls.
HOST LIVE saves your plugins' settings when you stop and restores them on the next Start.
8. What's new
The newest version comes first. This manual describes version 1.4.1 in full; later versions add a section here.
Version 1.4.1
Snapshots keep the tempo again: a song comes back at its own tempo, unless the tempo is followed from the console or a MIDI clock.
The tempo panel can be hidden: View ▸ Hide Tempo or Hide Tempo in the panel's right-click menu; a right-click on the header brings it back. The header buttons close up before they run into the tempo.
Switch a plugin to its other format: the right-click menu of a plugin's box offers its VST3 or Audio Unit version where both are installed.
Alt on a plugin window's close button puts away every plugin window.
The plugin list: its window can be dragged by its background, and a drag in the list scrolls it again; the VST3 list is read only when it is asked for.
Version 1.4.0
48 channels instead of 24, with up to four plugins in each. View offers six pages of 8, four of 12 (the default), two of 24 or one of 48. There is no separate HOST LIVE 48 any more: HOST LIVE is the one app.
Tap tempo takes the average of up to the last ten taps and goes on with them: the longer you tap, the steadier it gets. A tap that is off by more than a fifth of the usual interval is left out, the result is a whole number of beats a minute, and a pause of over two seconds starts again.
Right-click the BPM panel ▸ Enter tempo… types a tempo from 30 to 300.
A blue dot to the left of BPM blinks on every beat, counted from the last tap or the last tempo the console gave.
The blue trim mark on the level meters is a little larger.
Version 1.3.10
MIDI feedback with a display: besides the value, a controller that has a display is sent the parameter as the plugin writes it (“-6.0 dB”, “1.20 kHz”) and its name, as a SysEx message of HOST LIVE's own (F0 7D 48 4C 01 …). HOST LIVE Link shows them on the iCON D4.
A mapping whose message cannot be sent is no longer sent as an empty SysEx.
Version 1.3.9
MIDI control works both ways.MIDI ▸ Send parameter changes back to the controller sends what each mapped parameter is now out to a MIDI output (Output: the one of the same name as the input, or another), so a controller's motor faders and LED rings follow the plugin however the parameter was moved. What a controller has just sent is not sent back. See MIDI control in section 3.
ProLink: when the console takes the Touch and Turn knob for itself, HOST LIVE answers that it is done.
Version 1.3.8
View ▸ Hide Unused Strips (and Show Unused Strips) leaves the channels that have no plugin and no routing out of the pages: the others close up, the page tabs count only the channels shown, and the window height follows. Only a channel with neither a plugin nor a routing can be hidden; show them again to set one up. The choice is kept.
The top bar of a plugin's window now starts with a Bypass button, the same switch as the channel's. View ▸ Hide Plugin Control Strip (and Show Plugin Control Strip) takes the whole bar - Bypass, Sidechain, Tempo, MIDI and Learn - away from every plugin window; a right-click on an empty part of the bar offers the same, and in Touchscreen Friendly mode, where the header stays, it brings the bar back. See The plugin's top bar in section 3.
Settings ▸ Transport Plays tells the plugins that the transport is playing, with a time that counts from the moment the engine starts, for plugins that measure over time or follow the host's position (an integrated loudness meter, say). Restart Transport sets that time back to zero. Off by default.
With the question Check for a new version? switched off, the app still looks quietly at every start, and says in the About window (a click on the logo) when a newer version can be downloaded from hostlive.pro. Nothing else is shown.
The Performance Test window is closed with its Close button or Escape, not by a click outside it.
Quick Control now has two choices at the top of the list: Default leaves the strip to its own choice, None puts nothing of that plugin on the strip.
ProLink: a console with no session open asks for a new one before it will save; HOST LIVE answers that it is done and clears nothing.
In day mode the knob of swipe to stop is white, and the header of a running engine is a darker red instead of pink.
Version 1.3.7
The TRIAL (or BETA) badge now sits over the upper right of the logo, and the ProLink mark keeps its place above the version number whatever the badge does.
The Performance Test colours the bars and words by one verdict, going by the whole percentage shown: green up to 80 %, amber from 81 to 98 %, red from 99 % (a block that is late). Under the table it asks you not to use the computer while it runs, and the readings of each row go to the log when it ends.
Version 1.3.6
CPU Cores in the Settings menu replaces Parallel Processing: choose Automatic or a number of cores, from 1 (everything on the audio thread, as with Parallel Processing off) up to the number the machine has. A setting of Parallel Processing off from before becomes 1.
The Performance Test now only recommends: Use N Cores sets the CPU Cores menu to the number it found, and the number is marked (recommended) there. Where even the best setting has blocks that run late, the bars of the best settings are amber, the others red, and a line marks a block's whole time. The test sheet opens once, not again on top of itself.
Version 1.3.5
Resting the pointer on the IN or OUT square shows that side's trim in blue figures under the meter, as turning it does, headed Input trim or Output trim; they go a second after the pointer leaves.
Version 1.3.4
With Hover Help on, the IN and OUT squares now say that dragging them sets the gain trim (up to 12 dB either way, double-click for 0 dB).
The trim mark on the level bar stands one point out of the bar on each side, so that it is easier to see.
Version 1.3.3
Performance Test (Settings menu): runs the set as it is on the selected device, silently, with 1 to 16 threads, and shows the slowest blocks of each as a share of the time a block has. Use N Threads keeps the best for sets like this one (same device, rate, buffer, strips and plugins); Automatic forgets it. The test runs whether Parallel Processing is on or not; keeping its result switches Parallel Processing on, or off when one thread turns out best. Return starts it, Escape stops it.
Left to itself, the app now uses no more than 9 worker threads besides the audio thread: with more, the hand-over between threads took more than it saved on a 16-core machine, and the worst blocks were worse.
Version 1.3.2
Gain trim on every strip's input and output: dragging the IN and OUT squares up or down, plus or minus 12 dB, with a small blue mark on the level bar when it is not 0.
Channel height: Channel Height: Compact / Normal / Tall in the View menu draws the channels shorter or taller: less room in each at Compact, more room in each at Tall. Both this and Show Routing are also in the right-click menu of a strip (on its routing, or anywhere else on it).
Show Routing in the View menu hides the input and output pickers; the level meters turn upright, 10 points wide, beside the IN and OUT squares (which still set the trim), and the plugins take the room that is left.
The routing is held still while the engine runs (the pickers are grey), as the plugins are; rehearsal mode is the exception. The trim can be set at any time.
While a trim is dragged its value shows in large figures under the meter, and goes a second after the pointer is let go.
Double-clicking the device bar goes Full Screen and back, as double-clicking the header does.
Day mode: Appearance: Night / Day / Follow the System in the View menu draws the window in the warm paper colours of the website instead of the dark console look - fading over a second, with nothing to restart. Following the system, it changes when the system does.
Undo for the plugins: after a plugin is put in, replaced, taken out, moved or pasted (or a channel cleared) an Undo button appears right of the R and takes the change back, step by step.
Custom stereo pairs: Custom pair… under STEREO in the In and Out lists (or Type a number…) takes any two channels, such as 1-5 or 12-31, as the left and right of a strip.
Link In/Out: an entry in the In list of every strip (one switch for all of them) makes an input you choose be chosen as the output too, and the other way round.
Auto Routing keeps your routing when you change to a device with the channels it uses; only the strips whose channels the new device lacks are handed new ones.
A sun/moon button in the header switches between Day and Night mode with a click, as in HOST LIVE Link.
The name field of a strip lets go of the keyboard five seconds after the last key, click or arrow, so that a key press meant for the window cannot land in a name.
In Full Screen on the Mac, moving the pointer to the top edge brings the menu bar down without the empty strip that used to come down with it.
Version 1.3.1
ProLink remembers the console it finds first and follows only that one. If another console answers, HOST LIVE asks whether to follow it instead (Follow it / Keep following) and drives nothing on its word until you say so.
SuperRack through HOST LIVE lets in only a rack on the console's own network link, and SuperRack's list of snapshots now renames and adds snapshots here but never deletes them.
Sessions from the console: a name that would lead out of the HOSTLIVE folder, or that begins with a dot, is refused; saving a session from the console may now take up to 15 seconds.
ProLink messages that state an impossible number of snapshots no longer use up memory or make the app wait.
A sidechain taken from another strip is heard exactly as that strip last wrote it, also after a shorter block.
Version 1.3.0
Sidechain input for plugins that have one: right-click a plugin's box and choose one of the device's inputs to feed it.
Two strips in a row: choose ↓ below on a strip's Out and the strip below takes its output as its input (up to eight plugins).
Large interfaces (more than 64 channels, 512 say): In and Out list the channels in banks of 64, mono and stereo, and Type a number… takes a channel written by hand (130, or 130-131 for a pair).
Linked strips are shown as one: a single blue line goes round both, and the number box runs across them.
A plugin is looked at as soon as it is put in, in the background, so its sidechain input, latency and channels are known before the engine starts.
Save and Save As write the file in the background, so a slow or unreachable disk no longer freezes the window.
Questions and the plugin list now come up over the Snapshots window, not under it.
MIDI control of a plugin's parameters: a MIDI button and a Learn button in the plugin's window - touch a parameter, then move a control. Controllers, pitch bend and notes; Jump, Pickup, endless encoders, Toggle and While held. A copy of such a plugin asks whether to copy the MIDI control too.
Tempo from: Settings ▸ Tempo from - ProLink, taps only or a MIDI clock; a MIDI clock works on its own, without ProLink.
Rehearsal mode (the R button): the engine keeps running while plugins are added, replaced, moved and removed and the routing is changed; header and frame are yellow. For rehearsals only - each change dips the sound briefly and loading takes processor time.
Tap tempo: tap the BPM panel three times or more, or learn a MIDI note or controller to tap it; right-click it to choose ProLink or a MIDI clock.
Strip colours: the number box of a strip can be given one of six colours from its right-click menu (Colour). A strip left out of snapshots is now shown by a red line down both sides, no longer by a red number box.
ProLink compatibility: a DiGiCo console follows and drives HOST LIVE as it does a Waves rack - snapshots, tap tempo, sessions and Touch and Turn; switched on in Settings.
Version 1.2.3
Snapshots keep each plugin's bypass, and can be moved: drag a place (a snapshot or an empty one) in the list window to where it should go, between two others. Each snapshot can also have a MIDI message of its own that recalls it.
More buffer sizes: 16, 24, 48 and 96 samples join 32, 64, 128, 256 and 512, as far as the device allows them.
One license for HOST LIVE 48 too. A HOST LIVE key also opens HOST LIVE 48, and activations are counted together.
Snapshot list button in the header, beside the window buttons: shows and hides the snapshot list while Snapshots are on.
Touchscreen Friendly in the View menu: larger text and taller rows in menus and pickers, and the main window's large buttons on a plugin's window.
Snapshots in Full Screen. The snapshot list opens on the same Space as the main window when that is in Full Screen, not on another one.
Bypass plugin. Right-click a plugin's box and choose Bypass plugin: the chain goes on without it, its name is struck through, and it adds no latency. Choose it again to bring the plugin back. It works while the engine runs and is kept in the session.
Spanish and Chinese. The Settings menu has a Language choice, English, Español or 中文; the manual comes in Spanish and Chinese too.
The dropout counter counts a miss that Core Audio reports only when HOST LIVE itself saw the processing go late at the same time, so devices that report misses all the time no longer add to it.
Version 1.2.2
Everything since 1.1.0, including the small updates 1.1.1 and 1.1.3.
24 channels instead of 16, in three pages of 8, two of 12 or one of 24, and a chain of up to four plugins in each.
Save and Save As.⌘S saves the current session file, ⇧⌘S asks for a name. The session's name is shown under the Load and Save buttons, and the last session opens again at the next launch.
Asks before quitting, always; with unsaved changes in the session file it offers Save, Don't Save or Cancel.
No more channels left out for feedback: an unused channel whose output meets another channel's input is started like the rest.
A license on three computers. Activating puts the computer on the license's list (the internet is needed once); Deactivate takes it off.
Snapshots in the View menu: the settings of all plugins stored in a list and recalled with a click while the engine runs. A channel can be left out of them from the menu of its number.
The dropout counter counts only what Core Audio itself reports as a missed deadline, so it shows real dropouts and not blocks that merely ran long.
Restart after a crash: if the app closes unexpectedly, it opens again by itself within a few seconds, with the session as it was and the engine running if it was; after three crashes in two minutes it opens with the engine stopped. Quitting the app yourself does not restart it. A force quit counts as a crash.
Autosave every 10 minutes, on in the Settings menu unless you switch it off.
Remove plugin. Right-click a plugin's box and choose Remove plugin. The In and Out lists are now in columns of 16, and the Mono/Stereo switch is gone: stereo pairs are picked from the list.
Auto Routing is an option in the Settings menu, off by default.
Plugins can be dragged to another channel (Alt copies them), the DSP meter works with every channel in bypass, and a click on an error or notice puts it away.
Drag to scroll: press and drag up or down anywhere on the channels (also on the controls, which then do not react), the plugin list or the Quick Control list to scroll it, with momentum as on a tablet.
Two Quick Controls to a channel, on one plugin or on two. A third asks which of the two it replaces.
About window opens with a click on the logo, and says whom the license was issued to.
Changing the audio device while the engine runs asks first.
Intel-only plugins are flagged when you pick them on an Apple Silicon Mac (a VST3 will not open; an Audio Unit runs through Rosetta).
Copy and paste plugins. Right-click a channel's number to copy its plugins and their settings, and paste them into another channel.
Reset routing. Alt-click (or right-click) a channel's In or Out to reset that channel's routing, or every channel's, to none and mono.
Delay Compensation keeps up with plugin changes. If a plugin's latency changes while you play (a limiter switched to a longer look-ahead, say), the channels are lined up again by themselves. This works only while Delay Compensation is on. Opening a session while the engine runs now starts its plugins right away.
HOST LIVE · hostlive.pro. VST is a registered trademark of Steinberg Media Technologies GmbH. Built with JUCE.